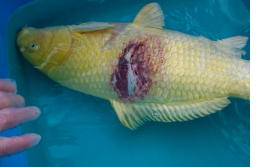
Major Damage
In cases of major damage where there is deep ulceration, extensive lesions or you need to work around the eyes, mouth or other difficult areas, the Koi should be anaesthised first in order to allow you to work on the fish without causing excessive stress, and risk further damage.
Before you anaesthise you Koi, prepare all the equipment and medications likely to be used for the treatment. Lay out a mat for working on (a baby’s changing mat is ideal for this purpose) and cover with a towel dampened with pond water. In very cold weather, leave soaking the towel until you are ready to transfer the Koi from the bowl to prevent excessive cooling. The Koi should be maintained at the ambient water temperature throughout this process and in very hot or cold weather, a separate bucket of pond water should be kept to one side into to continually soak the towel whilst the remedial work is underway. The work area should be shaded in the summer.
 Use only recognised anaesthetics. Measure sufficient pond water into the bowl and add the anaesthetic and mix well. Add an air stone. Gently place the Koi into the anaesthetic solution, start the timer and watch carefully. The timer is for guidance/ monitoring purposes only and you must watch the gill movement and your Koi’s reaction to stimuli. Only anaesthise the Koi to the minimum ‘plane’ of sedation required depending upon the work being undertaken. Remember that the Koi will continue to ‘go down’ deeper once removed from the solution due to the anaesthetic in the gills. Usually, I anaesthise Koi on the ‘light side’ and despite Gerry’s protests that’s its moving too much, after a couple on minutes in the towel its ‘out for the count’. With practice, you will be able to judge you own working ‘plane’.
After a few minutes in the anaesthetic solution, the Koi will loose stability and roll onto its side. Wait for a short period and place two hands under the Koi and raise a few inches. Once this can be achieved without the Koi flapping and trying to get free, raise out of the bowl, place carefully on the wet towel on the mat and cover over with a damp towel just exposing sufficient for treatment. Unless you are working close to the eye, ensure that the eye is covered by the damp towel to exclude light and reduce stimuli.
If you need to work close or adjacent to the eye, place a couple of drops of ‘Clear Eye’ onto the eyeball as this will provide a protective coating for any stray or splashed treatments being carried out nearby.
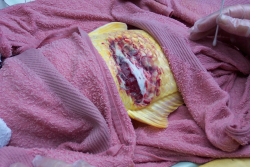 The initial cleaning process |
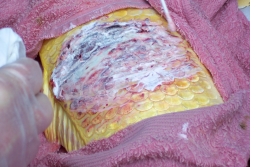
Using roccal wound spray collected into a container or a roccal liquid wash at a dilution of 20% roccal and 80% distilled water, thoroughly clean the wound removing all debris and loose scales using cotton buds dipped into the cleansing solution.During the cleaning process, scales around the edge of the wound should be lifted with the cotton bud and cleaned underneath. Any trapped liquid under the scales should be released. It is most important that you remove all necrotic (dead) tissue and clean back to undamaged surfaces otherwise the wound will not heal satisfactorily. |
It is most important that at least a half to two thirds of of your time should be spent on this cleaning process.
 Cauterising the wound |
Once the wound has been completely cleaned, its time to start to build-up the therapeutic and protective coatings.For open lesions and deep ulcerations, apply a Cauterising Paste or liquid to seal the surface, carefully applying with a cotton bud. The cotton bud should be discarded safely in a waste container when completed. |
 Applying the Bactericide |
Once the wound has been cauterised, the next stage is to apply the bactericide. There are many anti-bacterial dressings available from your stockists and some have been listed in section 7.Apply the bactericide using a cotton bud or brush (if extensive) over the entire area of the wound and under the scales on the ‘leading edge’ of the damage site. |
 Protective Coatings |
Once the bactericide coating has dried (only takes a few minutes and drying can be assisted by a small battery powered fan!), apply a waterproof protective coating. For deep lesions, we sometimes infill with Koi Cream or an orabased protective paste followed by a G7 liquid spray. However, the sealing coat will depend upon the depth and severity of the wound – with experience you will soon develop your own coating regime. |
 Back into the tank or pond |
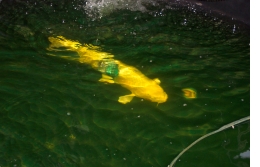
Having completed the topical dressing, return the Koi to the bowl of pond water (not the anaesthetic bowl which has been known to happen! – hence mark your bowls) and support with a hand under the head at the rear of the gills close to the air stone, whilst the Koi recovers from the anaesthetic. Alternatively, the Koi can be returned directly to the tank/ pond and supported close to the air stone until it recovers and swims away gently. It is not advisable to just lower the Koi into the pond letting it descend to the bottom and recover unaided. There have been cases where the Koi has been swept towards and onto the bottom drain by the prevailing currents causing further damage and distress. |
Once the Koi swim’s away, it will look a ‘bit drunk’ (if you can remember that feeling!) – this is due to the after-effects of the anaesthetic. Within five to ten minutes, the Koi should be fully recovered from the sedation.
 The ‘skinning – over’ process |
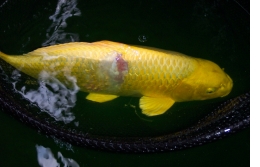
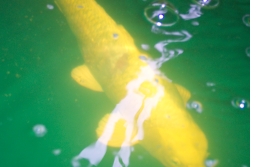
In order for the repair to satisfactorily heal, it is essential that the Koi is returned to an environment which has excellent water quality, plenty of air and is relatively stress free. In many cases, it is best to return the Koi to your main pond where the conditions are at least stable, unless you have an environmentally controlled hospital/ quarantine tank.Provided the treatment has been undertaken in a thorough and painstaking manner and the Koi has been returned to an environment conducive for healing, the wound should start to ‘skin- over’ after a few days, with a white protective layer forming over the wound. This process may well take several weeks to complete as new tissue is generated under the protective layer. |
 After one month, a scar is still visible which will reduce with time |
The tissue re-generation is temperature dependant. A good healing temperature is between 18C. to 22 deg.C. Between 14decC. to 18deg.C., the process is very slow. Above 22deg.C., pathogen generation may outweigh the healing process if your Koi is not in reasonably sterile conditions. |
Should it be necessary to repeat any re-treatment or re-coating; unless the wound has become re-infected again, do not go through the cleaning process as this will remove the protective barrier already formed and the regeneration will be taken back to the start again.